How to Install a Permeable Gravel Driveway Grid System
Every driveway has two jobs, carry weight and manage water. When rain can’t drain through the surface, it pools, erodes edges, and pushes runoff toward the foundation. Learning how to install a permeable gravel driveway grid system unites strength and drainage in one design that stays firm through every storm.
Why Choose a Permeable Driveway Grid System
Driveways fail when trapped runoff lingers above the base. Over time, moisture seeps into cracks, softens the subgrade, and breaks apart the surface. A permeable grid reverses that process: rain filters through the surface instead of running off, equalizing pressure and protecting the base from erosion.
The interlocking grid also strengthens the structure by distributing loads through its open-cell matrix, resisting deformation and freeze–thaw damage that weaken traditional materials. Understanding how to install a permeable gravel driveway grid system ensures that drainage and structural capacity perform as designed for decades.
Planning Your Permeable Driveway Installation
Before excavation begins, take time to plan the layout, verify drainage paths, and organize site logistics. A well-defined plan prevents wasted effort later, locking in geometry and staging areas so installation starts clean and stays efficient.
Define the Layout and Drainage Path
Map the driveway’s route, width, and turning points to ensure vehicles move safely and runoff flows correctly. Transitions to sidewalks, garage aprons, or adjoining surfaces should remain level to avoid pooling. Extra care, such as waterproof liners or sprays, can be used when permeable systems are directly adjacent to basement foundations..
Review Regulations and Site Access
Check local codes for setbacks, easements, and impervious coverage limits. Evaluate where equipment and materials will enter the site, and plan staging zones for stone and panels that won’t block driveways or utilities.
Organize Materials and Project Logistics
Once layout and permitting are complete, calculate aggregate volumes, fabric square footage, and grid-panel counts based on total coverage. For residential driveways, specify TRUEGRID PRO LITE for standard loads or PRO PLUS for heavier traffic or where driveways are sloped. Coordinate deliveries and rentals early so work proceeds continuously once excavation starts.
Project Costs and Timeline
Understanding cost and schedule helps set realistic expectations before work begins. Professional permeable driveway installations typically range from $10 to $20 per square foot, depending on excavation depth, soil stability, and site accessibility. The higher end of that range reflects deep bases or limited access.
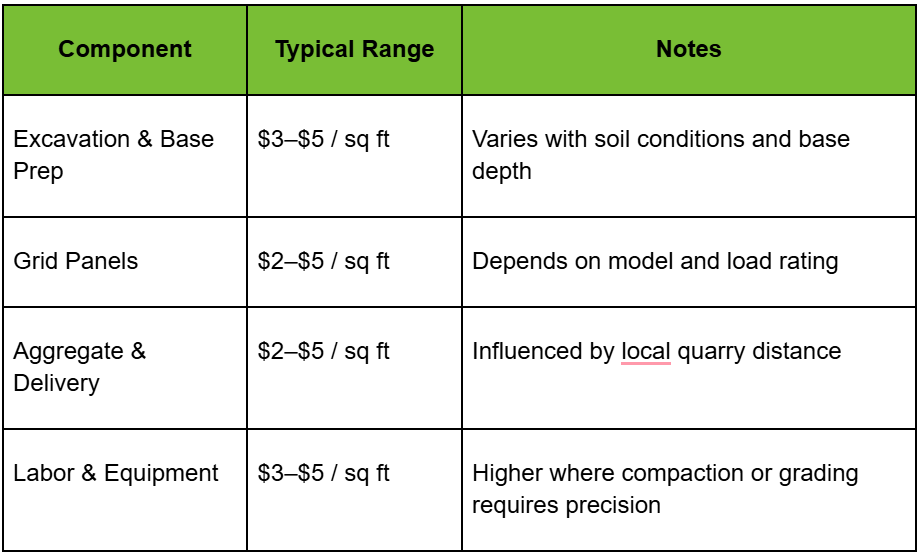
Cost Drivers by Component
Professional vs. DIY Installation
Professional crews handle excavation, grading, compaction, and grid placement. Their pricing includes labor, materials, and mobilization, with soils and permits affecting cost. DIY builds are lower but depend on aggregate volume, delivery distance, and rental equipment. A careful homeowner can save by sourcing stone locally, though poor compaction or drainage errors can offset those savings later.
Typical Project Duration
Once materials are staged, most single-drive projects finish in two days for professional contractors and three to four days for a DIY project. Before the first cut of excavation, review how to install a permeable gravel driveway grid system step by step so every layer, subgrade, base, grid, and fill material works together as a unified structure.
Tools and Materials Checklist
A successful installation depends on having the right equipment and clean, properly graded materials before work begins.
- Excavator or skid steer
- Plate compactor, rolling compactor, or jumping jack/tamping rammer compactor
- String line and stakes; level or laser for grade
- Geotextile fabric (separation/filter)
- Angular base rock (¾ in to 1 in clean, washed, for PRO LITE and 1 in to 1.5 in clean, washed for PRO PLUS) for gravel surfaces or densely-graded base / sandy-gravely road base (for grass).
- TRUEGRID PRO LITE or PRO PLUS panels
- Infill stone for gravel surfaces (½ in or ⅝ in clean, washed stone for PRO LITE and ½ in, ⅝ in, or ¾” washed, clean stone for PRO PLUS)
- Sod and topsoil or hydroseed and topsoil for grass infill applications
- Edge restraints (steel, concrete, or lumber)
- PPE (eye/ear protection, gloves)
Safety note: Call 811 to locate underground utilities before excavation.
Assessing Soil and Site Infiltration
Before breaking ground, test how quickly soil absorbs water. Dig a small pit, fill it, and time how long it drains. Sandy or loamy soils clear in minutes; clay may hold water for an hour. If infiltration is slow (< 0.5 in/hr), deepen the base or add an under-drain to move water laterally. Document percolation rates to meet stormwater rules and determine proper sub-base depth.
Step 1: Excavate and Prepare the Subgrade
Every durable driveway starts with a stable foundation. The excavation phase establishes base depth, removes weak material, and compacts soil to support the open-graded layers that follow.
Determine Base Depth: Excavate roughly 6 in for standard car use. Increase for heavier loads, weak soils, or extra stormwater storage. Remove all vegetation, roots, and topsoil until reaching firm soil.
Compact and Stabilize: Compact the excavated area floor. Lay geotextile fabric to prevent fines from migrating upward. A well-separated subgrade supports both structure and drainage.
Optional Edging: Place desired edging.
Step 2: Add and Compact the Base Layer
Spread clean angular stone (¾–1½ in.) or densely-graded base (for grass) to the design depth. Compact each lift (maximum 4-in lifts) until solid underfoot, no bounce, no give. Base depths can range from 4 in to 8 in or more and will depend on the existing soil compositions, the loading needed, and the frequency of traffic. Please consult with an engineer if you are unsure of the depths. General and typical recommended depths are still subject to site specific and project needs.
The voids between stones act as a subsurface reservoir, letting rainfall collect and gradually infiltrate the soil instead of running off the surface.
Step 3: Level the Base
Level the base with lasers or string levels for a smooth surface. Make sure the base has no visible changes over short lengths. Gentle undulation can follow the natural changes in the area as long there is adequate sub-base preperateion and base layer depths.
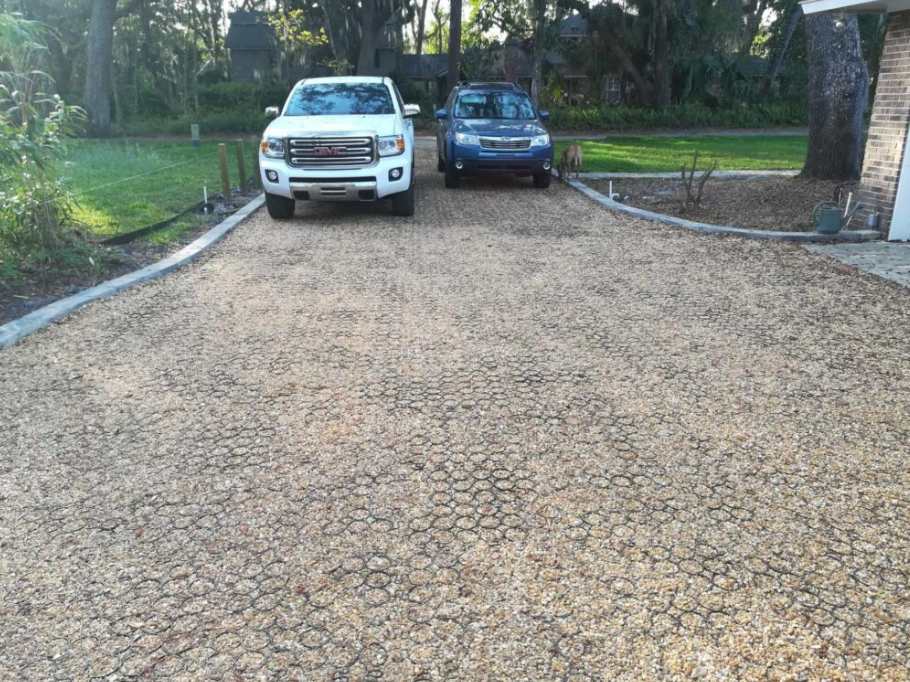
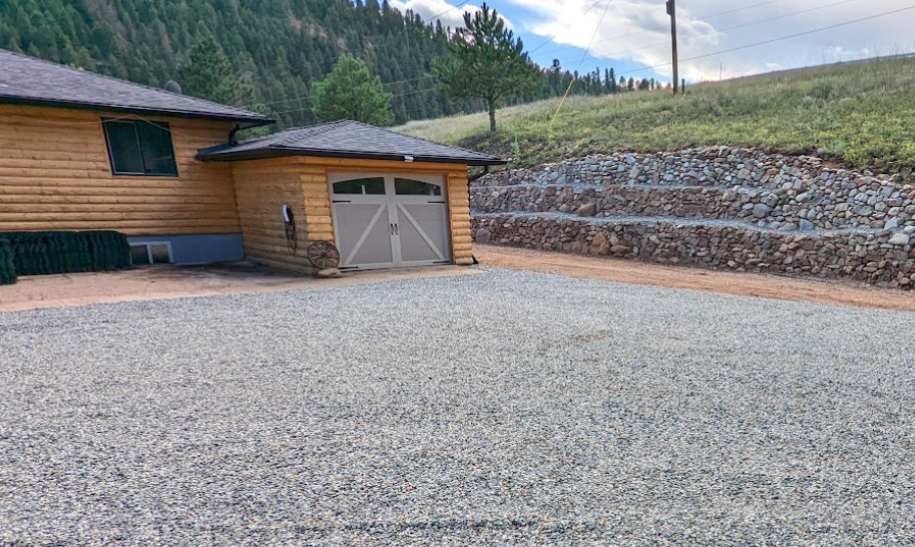
Step 4: Lay the TRUEGRID Panels
Lay panels by aligning the tab and lock connectors. It’s recommended to fan out from one corner to keep the pavers aligned in one direction on site. Step on or tap each grid until interlocks snap tight. On slopes, anchor the pavers with stakes to the base (please see additional advice for slope installations from TRUEGRID). Trim or cut grid as needed around curbing, obstacles, or curves with a circular saw or chop saw.
Step 5: Fill the Grid with Gravel or Grass
Infill forms the finished surface texture while maintaining permeability. At this stage, understanding how to install a permeable gravel driveway grid system helps balance compaction pressure and drainage flow.
Gravel Infill: Pour washed gravel into cells and use a broom or rake the stone level to the top of the grid. Gravel should self-align. Overfilling in not needed and compaction is optional.
Grass Infill: Fill cells with sandy-loam topsoil and seed with drought-tolerant species. Water gently until established so rainfall passes freely through the open cells. 1-inch sod can also be used in PRO LITE by wetting the sod and compressing it into the grid with a compactor. PRO PLUS should be filled half-way with topsoil and the remaining top half filled with the sod – wet and compacted into the top half of the grid.
Step 6: Inspection and Quality Check
A well-built permeable driveway feels firm underfoot. Check to see if all paver connections remain intact and that all fill is level to the top of the grid. Keep traffic off of grass infill surface for 3 mowing cycles. Gravel infill systems can be used immediately.
Maintenance for Long-Term Performance
Regular inspection and light cleaning preserve infiltration and surface strength.
- Remove organic debris such as leaves to prevent degrading and breaking down on the surface. Keep any other sediment sources off of the surface.
- Use plastic-blade shovels in winter; keep snow plow blades or snow blower hoppers raised slightly when removing snow; and standard de-icers are safe because meltwater drains into the base (do not use this with grass surfaces)
- Mow, water, and fertilized grass surfaces as needed. Do not aerate.
Long-term results depend on following how to install a permeable gravel driveway grid system correctly from the start, proper compaction and drainage minimize future maintenance.
Environmental and Structural Advantages
Permeable grid systems improve soil recharge, reduce heat, and extend pavement life. TRUEGRID panels are molded from 100% post-consumer recycled HDPE, spreading loads through the cell matrix to prevent rutting and fatigue. Surfaces stay 10–15 °F cooler than asphalt, and some municipalities offer stormwater-fee credits for permeable installations.
DIY or Hire a Professional?
A permeable gravel driveway grid system can be installed by skilled homeowners, but complex sites often justify professional oversight.
DIY: Small areas, firm soils, clear access, no under-drain tie-ins.
Hire a Pro: Steep grades, clay soils, or engineered drainage. Contractors experienced in permeable paver installation ensure accurate compaction and long-term infiltration.
Build a Driveway That Drains, and Lasts, with TRUEGRID Pavers
TRUEGRID permeable pavers combine strength and stormwater control in one system. Each grid supports traffic loads while eliminating surface runoff. Contact us today for more information.