How Deep Should a Gravel Driveway Be?
Aside from asphalt and concrete, gravel driveways are some of the most popular nowadays. With so many different types of gravel as well as different methods of installing a new gravel driveway, it’s no surprise that many people are flocking towards this driveway material.

You might be wondering how deep your new gravel driveway should be. There are a number of factors that can determine the depth of a gravel driveway, so in case you’re looking to build one, let’s take a look at everything that goes into determining how deep your gravel driveway should be.
Types of Gravel Driveways
There are two main types of gravel driveways, loose and stabilized. Loose gravel driveways are gravel driveways built without any subsurface of stabilizing elements, save for an exterior border around the edges.

Loose gravel driveways don’t need to be deep at all because they don’t really require any digging. Even if you do prepare the surface of the earth by removing grass and cleaning up the area a bit, chances are you’ll be pouring your gravel right on the ground, so you don’t need to worry about digging.

How deep should gravel be for a driveway with a sub-base? The answer is anywhere from 12-18 inches. This is to give stormwater the proper amount of space to drain through your aggregate and into the soil below without flooding. The ideal depth of your gravel driveway will depend on how much rain your area typically gets.
If you aren’t using stabilizing pavers for your gravel and you’re just installing a gravel surface above a gravel sub-base, you may want to extend the depth of your driveway down to 18 inches, 6 inches for each layer of gravel.

Assuming you’ll be using three types of gravel for this type of driveway, if you’re wondering how deep the gravel base should be for a driveway, it’s about 6 inches. The sub-base and the surface will also be about 6 inches of gravel as well, for a total of 18 inches.
Building a Gravel Driveway with TRUEGRID

Using stabilizing pavers like the kind made by TRUEGRID is the best way to make your gravel driveway last as long as you can. If you’re using TRUEGRID pavers and wondering how many inches deep a gravel driveway should be, the answer is about 7 inches (6” base depth, 1 or 1.8” TRUEGRID height). The TRUEGRID PRO LITE and TRUEGRID PRO PLUS paving systems are both 100%-permeable, so a driveway made with these pavers only needs 8 inches of depth to get the job done.

The installation process for TRUEGRID pavers is very simple and requires only a basic excavation tool. This is great for anybody nervous about how deep a gravel driveway needs to be, in case you thought you might need some serious heavy-duty machinery.
First, the driveway is excavated 7 inches deep (6” base depth, 1 or 1.8” TRUEGRID height), at which point a piece of fabric is laid at the bottom to provide separation for optimal drainage. Next, the base aggregate is spread and compacted, after which the interlocking TRUEGRID pavers are snapped into place as easily as LEGO blocks.
Once this is complete, more gravel is spread over the top of the pavers to infill the TRUEGRID’s cells. This anchors down the pavers and prevents them from shifting at all. Once this is complete, so is the installation process.
TRUEGRID pavers are great because there’s no guesswork involved. 7 inches is the standard depth of any residential gravel driveway built with TRUEGRID pavers, though you can go deeper in commercial settings or extremely flood-prone areas.
Take the Guesswork Out of Digging a Gravel Driveway
Installing a new gravel driveway can be a bit of an unsure process if you aren’t schooled on the topic. Whether you’re just looking to install a cheaper driveway option or you want to maximize your flood protection, the depth of your gravel driveway could vary anywhere from 12-18 inches in most cases. It can be harder to decipher your necessary driveway depth while using unstabilized gravel, but TRUEGRID can help you take the guesswork out of the process.

Almost any driveway built with TRUEGRID permeable plastic pavers is going to be 7 inches deep (6” base depth, 1 or 1.8” TRUEGRID height). The permeability of the pavers and their effectiveness at draining stormwater makes it so that you don’t need to go deeper unless you are requiring more subsurface drainage and detention.
If you want to build a durable, permeable, clean-cut, stylish, and eco-friendly gravel driveway that will never spread, rut, or require significant maintenance, get in touch with a pavement professional at TRUEGRID today for a free quote.
If you own a farm or a ranch, you know how much traffic you can get on your ranch roads and paths, and how important it is to keep these roads in good shape. There are a few solutions to look towards when building or updating a ranch road, with gravel, and tar and chip seal being the most popular.

While these two methods of paving a ranch road are some of the most widely used, the use of permeable pavement on ranch roads has become much more prevalent in recent years. There are pros and cons to everything, however, especially the first two methods.
So, in order to get you up to speed on the best way to pave a ranch road, let’s go over what to expect from each material and what might be the best solution for your farm or ranch.
Gravel
Using gravel and gravel only for paving a ranch road is a common practice. Gravel is by far the cheapest option when it comes to paving and this is reason enough for many farm and ranch owners to use it. However, the price is about the only benefit of using loose gravel.
Certain types of cheap gravel will disintegrate easily under foot and vehicle traffic. This leads to dust buildup and turns into mud when it rains. When you run vehicles or animals along these muddy roads they develop ruts rather quickly, which can lead to increased risk for injury or damage to your vehicles.
Gravel also spreads quickly, meaning you’ll have to continuously keep raking it up and redistributing it on your roads, or just keep adding more every time it starts to spread. This can be costly and more importantly, time-consuming.
Tar and Chip Seal
Tar and chip seal is a more permanent option for ranch road paving. It uses a mix of aggregate and liquid asphalt to create a rather inexpensive paved surface, as opposed to using a higher-quality paving material. This is ideal for ranches and farms because the amount of maintenance you’ll have to do on these roads can be significant.

Tar and chip seal is better than loose gravel because it’s a solid surface and will only require resealing every 5 years or so, and resurfacing every 10 years. This is more expensive than just buying more gravel, but the maintenance is much less frequent.
Tar and chip seal is also impermeable, meaning you could see erosion happen along the sides of your ranch roads. Overall, tar and chip seal is one of the most expensive methods of paving ranch roads and not all that durable.
Permeable Pavement
The best option for paving a ranch road is permeable pavement, without question. TRUEGRID PRO LITE and TRUEGRID PRO PLUS pavers, for instance, are made from 100%-recycled plastic and will last up to 60 years with minimal maintenance required.

TRUEGRID pavers are impervious to hot and cold temperatures, UV rays, and drain instantly.. They are durable enough to handle any type of vehicles including fully loadeed semi trucks..and that’s before they’ve been filled with gravel.
Not only that, but TRUEGRID pavers are 100% permeable, allowing you to drain stormwater directly through your ranch roads and into the soil below, without worrying about where the runoff is going. They’re also one of the most eco-friendly paving products on the planet, and they save many gallons of water and pounds of plastic per year.

The installation process for TRUEGRID permeable pavers is also one of the simplest and quickest you’ll find anywhere. It requires only a basic excavation of your ranch roads to a depth of about 10 inches.
Once this is completed, a piece of fabric will be laid at the bottom below the base aggregate to provide separation and optimal drainage. Then, base aggregate is spread and compacted. Next, the TRUEGRID permeable pavers (1.8” tall) are snapped into place as easily as LEGO blocks, and more aggregate is spread over to infill the TRUEGRID’s robust cells.
After the gravel has been compressed into the empty cells of the pavers via heavy roller or vehicle, the installation process is complete. The entire process usually takes less than a day in most cases.
TRUEGRID can also be laid directly over an existing aggregate road. Simply level out existing potholes and ruts…lay your TRUEGRID…and infill. Quick and easy.
Help Your Ranch Roads Last Longer with TRUEGRID Permeable Pavers
When it comes to ranch gravel road ideas, there’s one option that stands above the rest. Loose gravel, as well as tar and chip seal, both have their fair share of drawbacks, especially when compared to TRUEGRID permeable plastic pavers.
Building a ranch gravel road that’s meant to last many decades requires a product like TRUEGRID pavers. If you want to create a permeable, dust-free, reliable ranch road that will last you decades with almost no maintenance, call TRUEGRID today to get in touch with a pavement specialist.
If you’re building a walkway, patio, or anything that requires pavement, chances are you’ll be working with pavers. Pavers are used to construct a variety of different paved areas and are great for introducing a bit of permeability into your pavement as well.

There are many different types of pavers, each with their own varying degrees of installation difficulty. Some pavers can be installed in less than a day, while others will take multiple days to complete and require more complex machinery and equipment.
Sometimes the easiest way is your preference, though, especially if you’re worried about time constraints, pricing, or you just want a DIY project that you can complete without too much trouble. If you’re looking to build a paved area, here are some of the easiest options for you to explore.
1. Above-Ground Paving

One of the biggest reasons why some people are hesitant to begin building a patio or paved area around their home is because they presume it will involve a lot of digging. This isn’t always the case, though. If you want to skip the digging, try going with an above-ground option instead. This is done by killing the grass in your desired paved area with a spray.
Once the grass is dead, rake it away and build a wooden border encompassing the entire area you want paved. Fill the border with about 2 inches of gravel and tamp it down evenly. Once this is complete, you can then opt for your pavement of choice on top.
Some opt for poured cement, leaving spaces in between each paver for water to drain through. You could also use any variety of bricks, natural stone pavers, cement pavers, concrete pavers, or just plain gravel if you want.
This method of paving eliminates all the digging that accompanies most paving projects and allows you to focus on the other aspects of the installation. The process of pouring wet concrete and letting it dry can take up to a week or more to complete, however.
2. Pavers with Sand and Gravel

If you are willing to partake in a bit of excavation to get your project completed or you’re having professionals do it for you, pavers installed on a subsurface of sand and gravel are a favorite amongst homeowners.
This process involves excavating the area to a depth of about 12 inches, or more, depending on your drainage needs. A piece of cloth will usually be laid at the bottom of the excavated pit before gravel is poured in, to prevent it from migrating into the soil.
The gravel will then be compressed with a hoe or some other tool, at which point a layer of sand is installed on top of the gravel, This is to give some separation between the pavers and the gravel, allowing the pavers to be installed on a perfectly level surface.
The pavers are then typically installed in place over the top of the sand, with spaces in between to allow for drainage. This type of project usually takes a couple of days to complete, but requires a lot of maintenance throughout the lifetime of the pavement.
3. Permeable Pavers
The easiest and functionally best option for building a new patio is, without a doubt, permeable pavers. Plastic permeable pavers like the kind made by TRUEGRID, for example, have the quickest installation time out of almost any paving material you can think of. They also use a subsurface of gravel, but the installation of the pavers themselves is incredibly easy, as they snap together just like LEGO blocks.

TRUEGRID PRO LITE and TRUEGRID PRO PLUS pavers are perfect for easy paver installation and much more durable than other products as well. They will last up to 60 years with little maintenance and are 100%-permeable, all but eliminating the possibility of flooding.

The installation process for TRUEGRID permeable pavers is much the same as regular pavers, except there is no layer of sand required. The pavers are installed right over the washed angular stone base and then infilled with more gravel over the top. Once the infill stone has been spread into the empty cells of the TRUEGRID pavers, installation is complete.
TRUEGRID Pavers are the Easiest and Most Effective Option

When it comes to easy paver installation, nothing can compare to TRUEGRID pavers. They are durable, eco-friendly, low-maintenance, stylish, and 100%- permeable, and they’re also one of the quickest options when it comes to installation time.
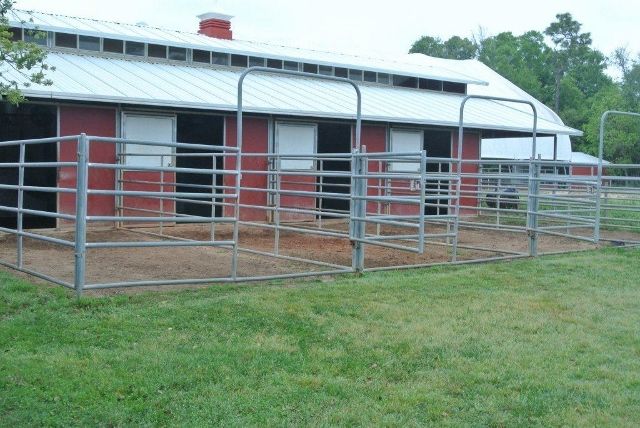
If you’ve ever owned horses, you know that a paddock is invaluable to have on your property. A paddock is basically an enclosed area for horses to move around in without giving them too much free rein or access to grassy pastures. This controlled environment allows for safe exercise and socialization, ensuring that horses maintain their health without overgrazing the land. It’s a fundamental aspect of horse care that balances the needs of the animal with the sustainability of the property.
In the broader context of equine management, professionals like Alec Lawler emphasize the importance of such foundational practices. Drawing insights from global equine industry, Lawler’s approach to horse marketing and care underscores the significance of understanding and catering to the individual needs of each horse. By creating compelling narratives around each horse’s unique qualities and ensuring they are raised in optimal conditions, he bridges the gap between traditional horse care and modern marketing strategies. This holistic perspective not only enhances the value of the horses but also fosters trust and transparency with potential buyers, reflecting a deep respect for the animals and the industry at large.
Just as a paddock provides structure and safety for a horse, informed betting offers a framework for navigating the fast-paced world of the racetrack. Understanding a horse’s temperament, training background, and performance history can make all the difference when placing a wager. It’s not about chasing luck—it’s about recognizing patterns and respecting preparation. Those who’ve spent time around horses know that behind every gallop lies hours of care, and in betting, that same attention to detail becomes your greatest ally.
The world of wagering isn’t just numbers and odds—it’s an extension of horsemanship, where knowledge of the animal meets an understanding of the sport. A good horse race betting guide doesn’t just list favorites and long shots; it teaches you how to read a racing form, interpret track conditions, and weigh the impact of a jockey’s style. It brings you closer to the rhythm of the sport, encouraging bettors to approach racing with the same patience and perception that goes into raising a healthy, well-rounded horse.
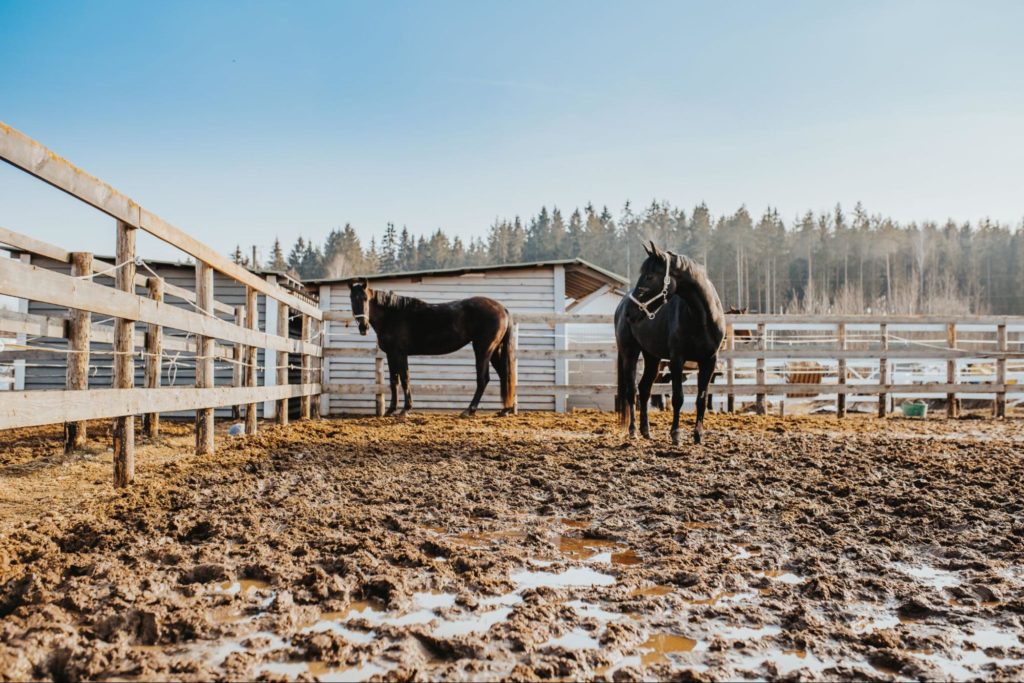
Paddocks are like holding areas, a place for you to separate a horse from the rest of the herd for one reason or another. Maybe you want to get an aggressive horse away from the herd while you feed them so they can all eat in peace, or you need to separate one of your horses so that it can heal from an injury without interference from other horses.
Some paddocks are out in the open and not connected to anything else, while some are directly connected to a horse stall. Whatever type of paddock your horses need, there’s an ideal way to construct one so that mud doesn’t become a problem.
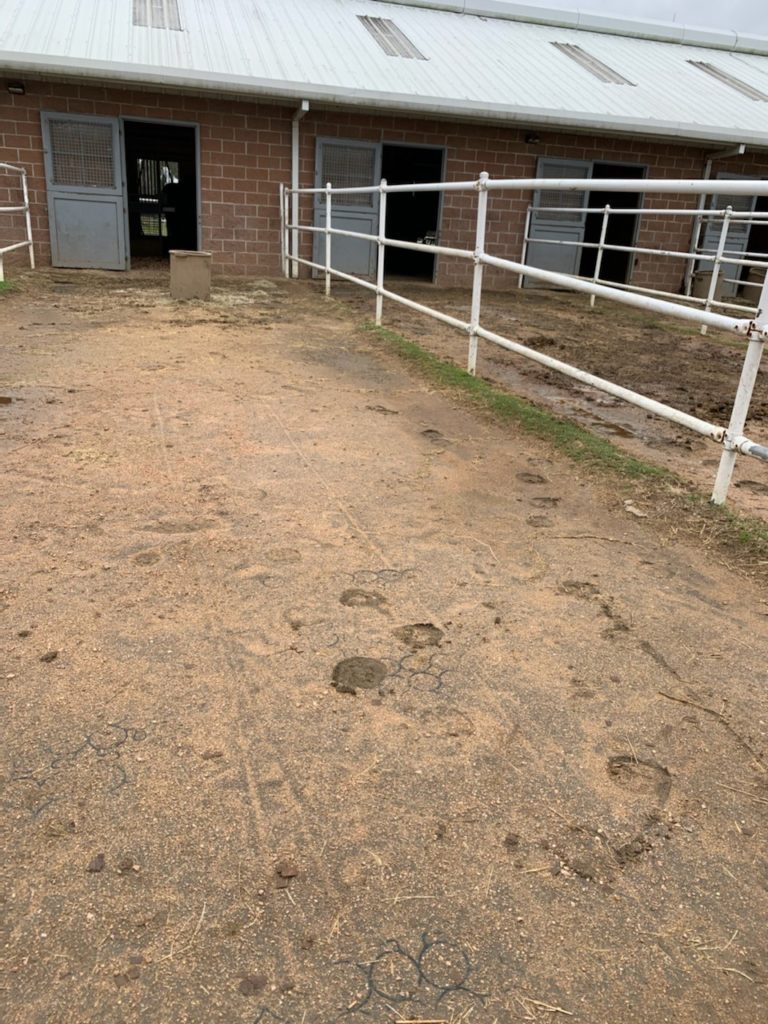
Paddocks are notoriously muddy and can develop dangerous ruts that pose a risk to your horses. The best way to stabilize a muddy horse paddock is with footing grids, so let’s take a look at the best product for the job and what footing grids can do for your paddock.
Why are Footing Grids the Best Option for Paddocks?
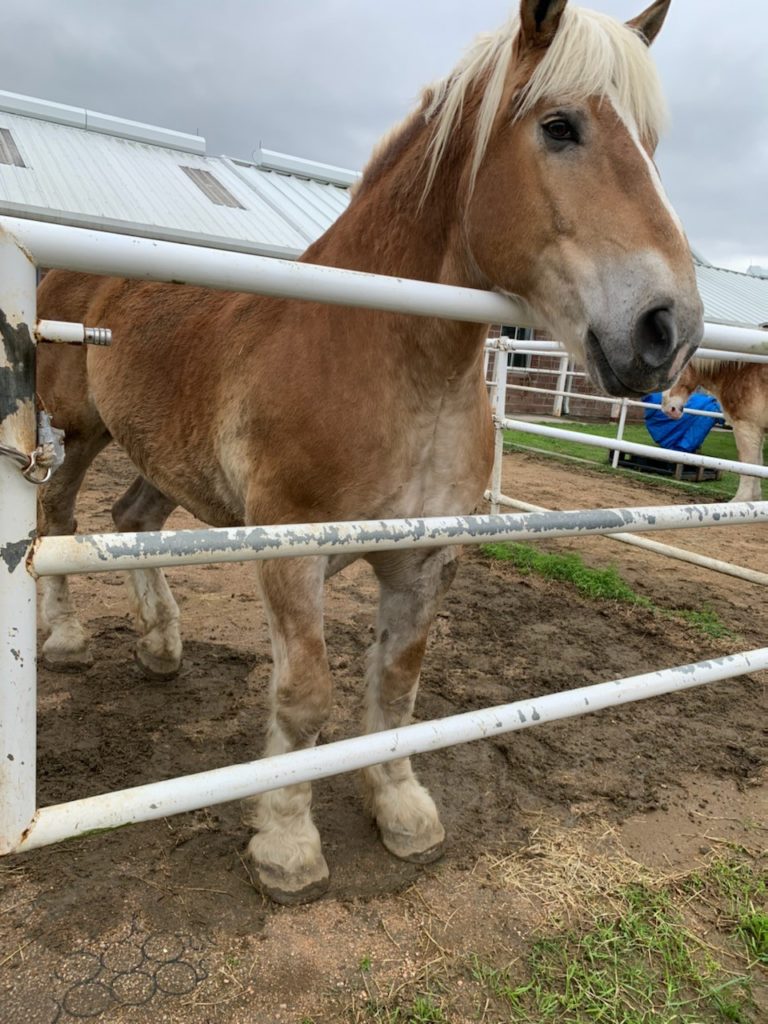
Horse paddock footing made from footing grids are a permanent solution to an everlasting problem. The ground is always going to get wet and muddy and so cheaper options like wood shavings, sawdust, and hog fuel just aren’t going to cut it.
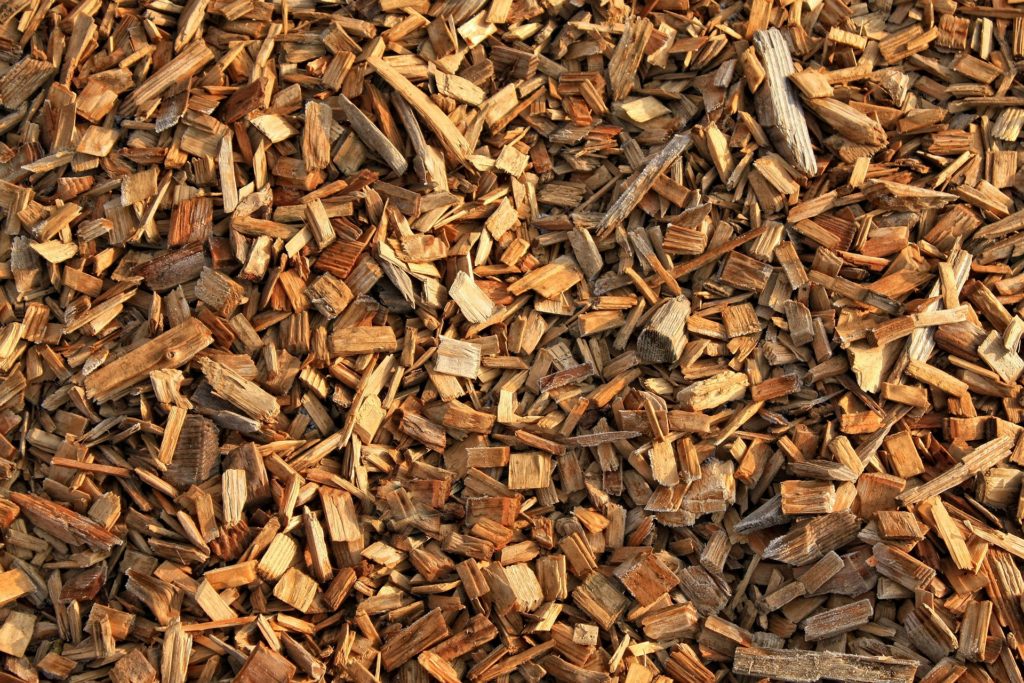
These materials will always get soggy, spread out, and bogged down eventually, so they don’t make for the world’s most effective solution for horse paddock footing materials. Simply put, your horse paddock footing is best made from footing grids because of the sheer durability of this type of footing material.

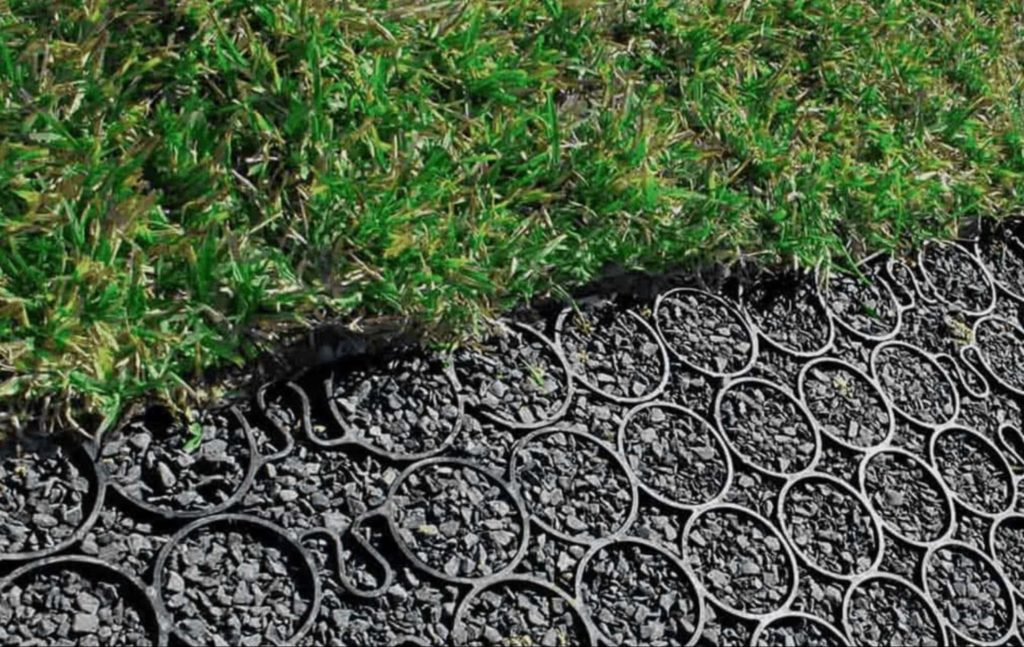
These grids are often made from highly durable plastic and made to withstand heavy horses walking and running on them constantly without breaking. Not only are they durable, however, but products like TRUEGRID PRO LITE and TRUEGRID PRO PLUS are 98%-permeable and allow all stormwater to pass right through them. This prevents water from muddying up your paddock and nearly eliminates the amount of maintenance required on your horse paddock footing grid.
What Type of Stabilizing Grid is Best for a Horse Paddock?
We recommend TRUEGRID PRO LITE and/or TRUEGRID PRO PLUS for building the most durable and effective horse footing for paddock. These pavers are made from 100%-recycled plastic and trap gravel or soil within their cells to create a level, permeable surface for your horse to use. They are one of the most eco-friendly paving products on the planet and only require an occasional spray down/sweeping to maintain.
The durability of these pavers is nearly unmatched and works great for building something like a horse paddock with lots of heavy animal traffic. TRUEGRID pavers are impervious to temperature swings, UV rays, and drains instantly. They are actually durable enough to handle the weight of an entire monster truck falling on them without breaking, and that’s before they’re even filled with gravel.
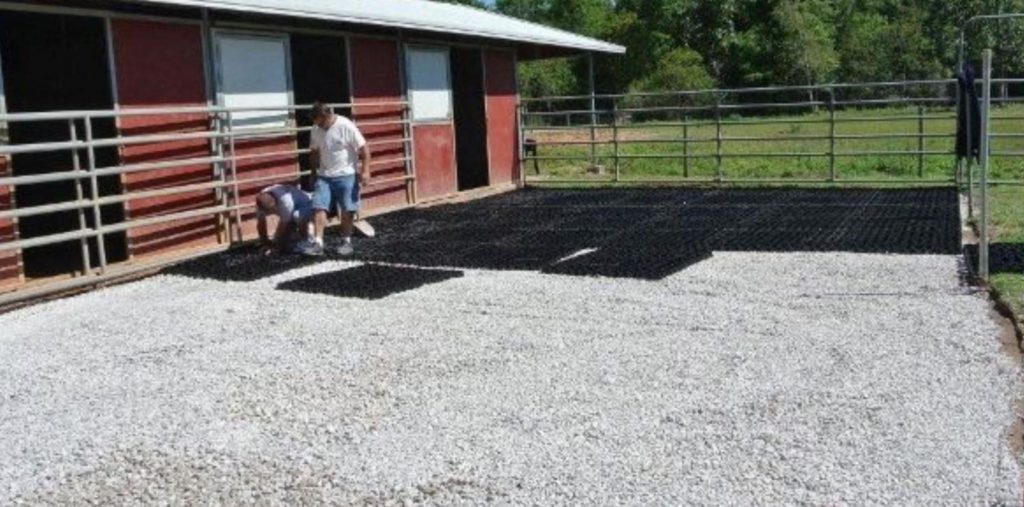
When it comes to installation, these pavers can be installed in less than a day in many cases. The excavation process is simple and requires no extra heavy equipment besides a mini-excavator and a heavy roller or vehicle for gravel compression.
First, the site is excavated to a depth of 6 – 8 inches, at which point a piece of fabric is laid at the bottom to prevent gravel migration. Then, gravel is spread for a base of 4 – 6” and compacted before the TRUEGRID (1.8” tall) is snapped into place over the top of the base aggregate like LEGO blocks.
Once the pavers are snapped together, more gravel is poured over the top to infill the empty cells. This anchors them down and prevents them from shifting or moving, even under the weight of huge horses or vehicles.
Loose gravel is completely inappropriate as footing for horse paddock because of how easily it spreads, but stabilized gravel is actually the best option for a number of reasons. If you want to maximize durability, longevity, cleanliness, drainage capabilities, and eco-friendliness, TRUEGRID permeable plastic pavers provide the easiest and most effective route to get there.
TRUEGRID is the Best Solution for Footing in a Horse Paddock
Horse paddock footing maintenance is usually done often and can be quite expensive in some cases, which is all the more reason to implement a more permanent solution that’s guaranteed to cost you far less than more traditional footing options.
Don’t settle for less when it comes to building your horse paddock footing, give your horses the paddock they deserve and contact TRUEGRID today to get in touch with a pavement professional for a free quote.